

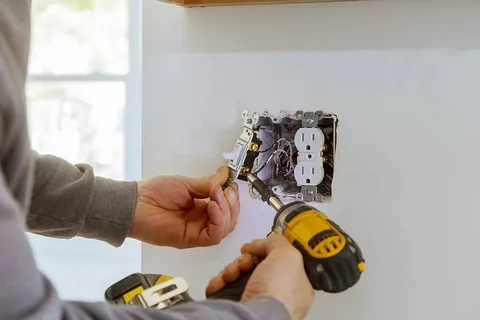
Loose outlets can spark and overheat, which risks a fire. Many issues start with a loose box or device. With simple steps, any outlet can feel sturdy again. Also, quick checks catch problems before they grow. Many homeowners learn from Saucier electrical outlet installation services, that small fixes make a big difference. For example, tighten screws, add spacers, and test the fit. Then, confirm the plate sits flat and does not rock. Next, verify the wiring is snug and safe. Finally, test with a plug to be sure. As a result, outlets stay steady and safer daily.
1.The Best Saucier Electrical Outlet Installation Services tips.
A shaky box causes the outlet to move every time a plug is used. Over time, that wiggle loosens wires and screws. First, check if the box is fastened to a stud or clamp. If not, add a retrofit “old-work” box with locking tabs. Also, tighten mounting screws until the box sits flush. The National Electrical Code calls for boxes to be flush with the wall surface. Therefore, use a box extender if tile or paneling makes the wall thicker. Next, shim the ears behind the box if needed. But avoid over-tightening, since that can crack drywall. Finally, verify that the device ears rest flat on the box. This simple step stops movement, reduces arcing, and keeps plugs tight. Then test with a gentle tug to confirm nothing shifts.
2) Add outlet spacers to stop wobble
When the outlet sits too deep, the yoke floats and the plate rocks. Spacers or shims fix the gap between the device and the box. Midway through the check, Saucier electrical outlet installation services stacks nonmetallic spacers for a snug fit. So, use only the listed spacers that do not crush under pressure.
-
Slip a rubber or fiber washer over the 6-32 screw.
-
Add nonmetallic spacers behind the yoke until flush.
-
Recheck the wall plate alignment before final tightening.
-
Finally, tighten screws until the outlet stops moving.
Therefore, the faceplate will sit flat and resist stress. Also, cords will not twist the device. Then, plugs slide in smoothly without rocking the plate. This easy fix boosts stability and safety.
3) Upgrade to spec-grade receptacles for a stronger hold
Cheap outlets wear out fast. Contacts relax and plugs fall out. Instead, select spec-grade or commercial devices. These have thicker metal yokes and tighter spring contacts. Also, many include back-wire clamp terminals. Those clamps grip conductors better than backstab holes. Backstabbed wires can loosen with heat cycles and age. Therefore, move any backstabbed wires to the screw clamps. NEC 110.14 supports tight, secure terminations. Moreover, tighten hot and neutral screws to the listed torque. A small torque screwdriver helps avoid stripping. Then, confirm the outlet sits flat on the box ears. But do not bend the yoke to “force” alignment. That can crack the device body. Finally, test with a heavy plug, like a vacuum. The plug should feel snug and steady. This upgrade reduces heat, flicker, and unwanted movement.
4) Tighten terminals and add a ground pigtail
Loose terminals cause heat and arcing. Therefore, check every screw for the right torque. Midway through the tune-up, Saucier electrical outlet installation services added a ground pigtail for reliability. Also, use copper pigtails with approved wire nuts.
-
Move backstabbed wires to side clamps or binding screws.
-
Pre-bend hooks clockwise for side-screw terminations.
-
Add a ground pigtail from the box to the device.
-
Torque is according to the manufacturer’s specs for lasting grip.
Moreover, wrap the device with electrical tape over the screws. This reduces accidental contact when pushing it back. Then, fold wires neatly to relieve strain. But avoid sharp bends that stress copper. Finally, tuck the device into the box and retighten the yoke screws. Solid terminations mean less heat and a steadier outlet face.
5) Extend the box for tile, paneling, or shiplap
Wall upgrades can bury the box edge behind new material. As a result, the outlet floats and the plate flexes. Use a UL-listed box extender to bring the box edge flush. Also, ensure the extender matches the box shape and size. Then, slide it over conductors without nicking insulation. But keep the device centered, so the plate sits flat. Therefore, outlet alignment stays true after the upgrade.
-
Measure wall thickness to pick the correct extender depth.
-
Choose nonmetallic extenders for plastic boxes.
-
For metal boxes, match metal extenders and maintain bonding.
-
Retighten the yoke and confirm plate fit afterward.
Moreover, check that no gaps expose combustible material. NEC 314.20 requires proper box flushness with the surface. Finally, test the outlet with a simple plug. The device should no longer wobble or tilt. This fix restores support and keeps the faceplate steady.
6) Match screw length and support the wall plate
Mounting screws that are too short cannot grab threads well. Then, the outlet loosens again after a few uses. Instead, carry longer 6-32 machine screws for deeper boxes. Also, replace stripped screws before reassembly. A secure yoke means a sturdier faceplate. Moreover, consider a metal or reinforced plate in high-use areas. These resist cracks and spread the load on drywall. But do not overtighten, since plates can bow or break. Therefore, snug the screws until the plate stops moving. Next, add a rigid “midway” plate if the opening is rough. It hides flaws and supports the outlet better. Finally, check alignment so the slots sit vertical. Good alignment helps plugs insert cleanly. Then, test with a phone charger to confirm a firm fit. This simple hardware change boosts day-to-day stability.
7) Test performance and add safety upgrades
After securing the outlet, verify the function. Use a three-light tester for hot-neutral-ground checks. Also, press the GFCI test button in kitchens, baths, and garages. Furthermore, Saucier electrical outlet installation services suggest tamper-resistant receptacles for homes with kids. They have shutters that block foreign objects. Moreover, AFCI protection helps catch arcing faults on living area circuits.
-
Use a plug-in tester to confirm correct wiring.
-
Upgrade to tamper-resistant receptacles for child safety.
-
Add GFCI where water is present, as codes require.
-
Consider AFCI protection to reduce arc-fault risks.
Therefore, the outlet will be safer and steadier in use. Then, label the breaker for quick resets. Finally, keep a record of test dates. Regular checks reduce surprises and future wobbles. This step closes the loop on both safety and stability.
8) Balance loads and label for future ease
Stability also depends on what the outlet serves. Heavy loads stress weak connections. Therefore, avoid daisy-chaining space heaters or window units. Instead, dedicate circuits for big loads when possible. Also, label the device with the breaker number. That small step speeds future repairs. Moreover, map outlets on a simple floor plan. This makes troubleshooting fast and calm. Then, keep a short checklist near the panel. It should note torque, spacer use, and test dates. Finally, schedule seasonal checks before peak use. Summer and winter loads can reveal weak spots.
Conclusion
These eight fixes make outlets sturdy, safe, and simple to maintain. For larger jobs or code questions, call a licensed electrician. Also, ask about maintenance plans and safety inspections. Finally, homeowners can reach out to Coastal Improvements for friendly guidance and reliable help.